#coreldraw (software)
Explore tagged Tumblr posts
Visit Tumblr Blog
Explore Tumblr blogs with no restrictions, modern design and the best experience.
Last Seen Tumblr Blogs


Fun Fact
70% of Tumblr users say the Dashboard is their favorite place to spend time online.
Text

#Tech#Computer#RetroTech#Retro#RetroTechnology#RetroComputers#VintageComputer#RetroComputing#Magazine#CorelDRAW#DesktopPublishing#Presentations#TechnicalIllustrations#UNIX#Software
30 notes
·
View notes
Text

CorelDRAW! 3.0 - CorelPHOTO-PAINT! - icon 003
73 notes
·
View notes
Text
CorelDRAW Graphics Suite 2024
Professional graphic design software. CorelDRAW Graphics Suite is your fully loaded professional design toolkit for delivering breathtaking vector illustration, layout, photo editing, and typography projects with total efficiency.

2 notes
·
View notes
Text
GIMP

Ironically the most replies I ever had on Imgur.
OK look here's the skinny on why I don't like GIMP: A long discussion with screenshots
To start with, there's two classes of users:
A: People who never use art apps, don't make art, and maybe tweak a couple of photos for colour balance every couple of years: They love GIMP. They hardly use it or never use it but it's FREE and OPEN SOURCE and they heard Adobe was BAD SOMEHOW because they CHARGE MONEY. They love GIMP. They will die on that hill. GIMP is the best. One day they may even use it.
B: People who are enthusiasts and professionals who actually want to make something and have graphics tablets, strong opinions on CMYK and whether Kyle Webster is over-rated or not. And they don't use GIMP because they tried it and it doesn't do the job.
To go for a comic analogy It's like bystanders telling EMTs their technique is wrong because they saw this Spongebob episode where he used bandaid.
Anyway: Who the hell amI? I feel like I should establish some Bona Fides: not just some random shouty dude. I started out with MS Paint in 1989, then Deluxe Paint Enhanced for PC. I started doing Desktop Publishing with CorelDraw and some non WYSIWYG layout engines. Spent a miserable few years with Quark, moved on to Photoshop... 3 I think. Jettisoned that after it got too bloated (It has a 3D print system inside it!!) In amongst I've tried GIMP, Krita, Clip Studio (Now and back when it was Manga Studio and really didn't want you to use colour), ProCreate, Adobe Fresco, ArtRage, Kai's powertools, 3D Studio (Back before it was Max), Maya, Blender, Inkscape, Serif Studios, Art Studio Pro... I was a graphic designer for several companies, self employed, and worked for Anthrocon doing colour on their badges for around 15 years, as well as creating designs for thier printed work and occasionally keycards, and t-shirts, and designs for badges when they didn't have any art from a GoH. To put it simply I'm not an Adobe Fanboy screeching about people using non-Adobe software. I've seen people who wanted to move to digital give up after buying hundreds of dollars of hardware because they got told GIMP was TEH GOODEST. Anyway...
But every time someone wants to get into art to paint the picture they have inside them, or do some fanart or mess with graphics design, group A crawl out from their bog of incompetence and demand that people use GIMP. Not just suggest it, but actively shout down group B, the people who have experience.
Because Group A would rather push their dogma that paid software is always the wrong solution, than accept that GIMP's frankly shit.
It's just hit version 3.0 after only 30 years. Go team.
Points to note: If you need support for GIMP, the answer is always "Runs OK for me LOL" or "I don't use it but all your problems are because you used Photoshop once." or the good old "Switch to Linux."
In the interest of fairness I'm going to install this new amazing version of GIMP and see if it's any better.
Infamously, the software is so awful that almost all images on Google that you find are pictures of people re-creating the GIMP Logo in GIMP to prove that it is on a par with MS Paint. And it's not a good logo.
First boot:
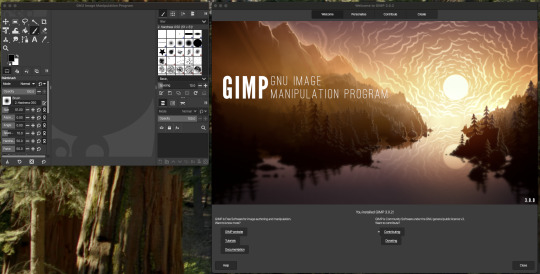
OK so it opens up a giant panel that tells me I installed GIMP. Presumably a warning. You can't access the actual app unless you've first navigated the splash screen. The app assumes your'e still on an 800x600 monitor. Nice. I suspect the splash screen was supposed to laod over the top of GIMP because... uh... ANYWAY.
Select create Select Make a new image Select a size... hit OK and voila.
Just as a note: Other apps do this in a single panel, or just open the app and let you hit File > new > Select size and bit depth & colour space... which GIMP also skipped.
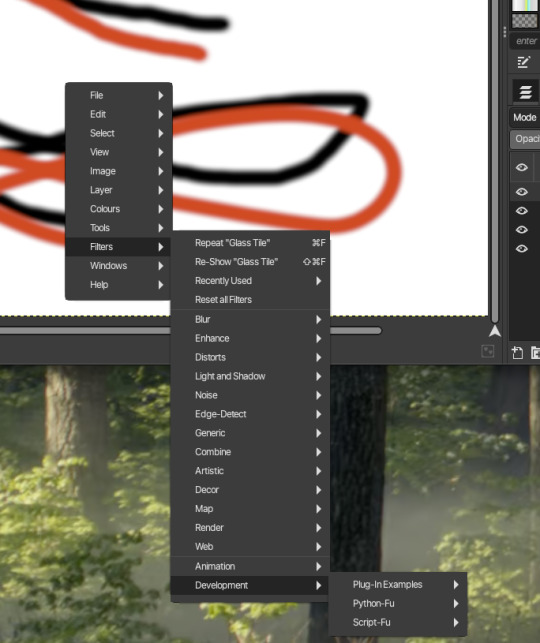
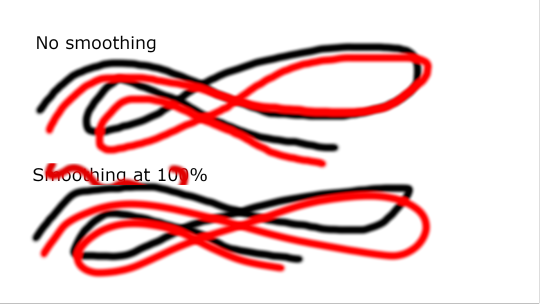
OK so I'm using a mouse. so let's do a test line then find and turn on the stroke smoothing. Wow!
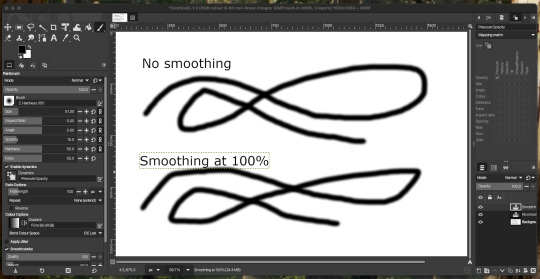
... This is worthless! Looks like the smoothing amount doens't do anyting, you have to tweak the other option on a scale of 0 to 1000.
For those of you playing at home: That makes no sense, because everything else is 0-100.
Also brave choice to make sure that when you pull up the settings they replace the brush palette... on the opposite side of the screen, and give you no way to switch back.
The setting which are incidentally locked, making them... double worthless.
Fun trivia! If you mis click at the bottom of the brush palette, on the left, it just deletes your tool preset! Genius. Sticking a button for a process you'd almost never do, next to the Undo/redo icons. Chef's kiss. Perfect UI design.
I hear they're making a car. The 'explode fuel tank' button is next to the switch that turns the headlights on. You may ask why they have an 'explode fuel tank' button. Yes. You may ask.
Now having created a text label, I somehow am not allowed to draw outside the text label. This is not normal.
There is no Unselect option at all in the selection menu. Escape does't do it. Hitting option/alt pops up a messages saying there's no selection to remove:
... despite there being a selection to remove.
GIMP's infamously mazelike right click menu that copies the taskbar menu is still around:

Why have one set of menus when you can have two of every menu?
Not pictured: The giant tooltip that pops up and covers the thing you're trying to click on. Seriously, I couldn't get a screenshot of it.
Back to drawing...
Apparently the solution is to create a new layer. One text object is still text, the other randomly rasterised itself and locked the selections to it's own boundary box. That is sub-optional or "entirely stupid, who wrote this garbage?" if you're being formal.

These guys. That's who.
Still got a maze of options including 'Y not use PYTHON to make a pic‽"
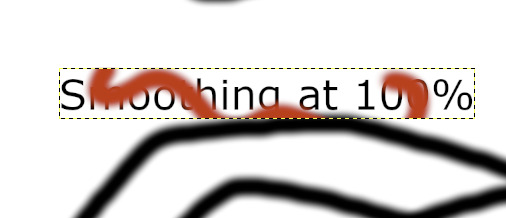
At this point I notice that the vibrant red I pick in the colour picker is showing as desaturated orange in the screenshots. Which is weird because it's supposed to be 8 bit sRGB, aka the basics. But somehow this has been fucked up - GIMP: "Colour accuracy? But Why?"
Let's try an export. a mere four or five clicks later...
... where the hell is it? Let me try that again...
OK. Uh. Great. A third visibly different shade of red to the one I drew with.
At this point, I'm done. I could learn to use the tools easily. I could dig through the manual and look for whatever ass backward UI decision lets you resolve it's inherent flaws like rasterising text at random...
... but if I tell it to use 100% red and it insists on using some buggy kludged system that outputs it to a different shade, then why bother? Nothing you do will come out looking the way you intended.
Meanwhile Clip Studio's over here doing 100% of everything you need for amateur or enthusiast or even pro level art (I created one of Anthrocon's T-shirts in Clip Studio), and it'll run on a tablet and let you draw on $400 of hardware or a desktop and a graphics tablet.
And if by some goddamn chance you got all the way through this, send me a boop in the notes!
16 notes
·
View notes
Text
Januar 2025
Fortschritte bei der Demilliardärisierung
Ich berichte im Techniktagebuch-Chat davon, dass ich gerade ausprobiere, ob ich auch ohne Google Maps zurechtkommen kann, seit der Umbenennung des Golf von Mexiko.
Angela H. sagt: "Müssen wir bald wieder alles selber löten, weil Millionäre alles ruinieren? Wir haben zu oft 'wir hatten ja nix' gesagt, bald haben wir wieder nix!"
Ich sage, dass ich im Vergleich zu meiner "I drive my Google to the Google to buy some Google for my Google"-Zeit schon sehr entmilliardärisiert bin und bisher keine Komforteinbußen spüre, eher das Gegenteil. Das fällt mir aber gerade zum ersten Mal auf. Deshalb hier eine Übersicht:
In meiner Erinnerung war es ungefähr in der zweiten Hälfte der Nullerjahre, dass ich mich von Microsoft-Produkten verabschiedet habe. Das lag noch gar nicht an Milliardärsüberlegungen, ich wollte nur (aus vergessenen Gründen) keine unbezahlten Versionen von eigentlich kostenpflichtiger Software mehr verwenden. Seitdem habe ich kein Microsoft Office mehr, sondern LibreOffice (brauche es aber nur ca. 1x jährlich). Ebenfalls ungefähr seit dieser Zeit benutze ich für Grafik nicht mehr Photoshop und ... Coreldraw, oder was wir damals für Vektorgrafiken verwendeten, sondern Gimp und Inkscape. Ob ich dadurch schlechter dran bin als mit den kommerziellen Alternativen, weiß ich nicht, weil der Umstieg schon zu lange zurückliegt.
Die jährliche Techniktagebuch-Buchversion stelle ich mit LaTeX her. Das ist nicht mal eine Alternative zu einer kommerziellen Lösung, meines Wissens gibt es gar nichts anderes, mit dem man ein 16.000 Seiten langes PDF mit Inhalts- und Stichwortverzeichnis aus den Blogbeiträgen erzeugen könnte.
2015 habe ich das Facebook-Tab im Browser geschlossen und 2017 die Facebook-App von meinem Handy gelöscht. Im Sommer 2024 habe ich noch mal beschlossen, pragmatisch zu sein und wieder öfter bei Facebook reinzuschauen wegen der Verwandten und Freund*innen, die halt nur dort sind. Aber das war (wegen der US-Politik) ein sehr ungünstiger Zeitpunkt für diesen Plan und ich habe ihn kurze Zeit später wieder verworfen. Fazit: Das mit den Verwandten ist zwar schade, aber immer, wenn ich mal reinschaue, muss ich durch 98% Unsinn waten, der gar nicht von Leuten stammt, die ich kenne. Ich bin immer froh, wenn ich Facebook wieder schließen kann, es ist wirklich keine schöne Nutzungserfahrung.
Seit März 2020 kaufe ich Gegenstände, die keine Bücher sind, nicht mehr routinemäßig bei Amazon, sondern entweder gebraucht bei Ebay oder direkt in den Onlineshops der jeweiligen Firmen. Die Ebay-App ist gut, Kaufen geht darin genauso schnell wie mit 1-Click bei Amazon. Fazit: Fehlt mir nicht, außer etwa 1-2x im Jahr, wenn es ein Produkt nur bei Amazon gibt, oder wenn es wirklich schnell gehen muss.
Im Februar 2022 bin ich von Chrome wieder auf Firefox umgestiegen. Fazit: Alles ist mindestens so gut wie vorher.
Ende 2022 bin ich von meinem Macbook (mit einer kurzen Chromebook-Übergangszeit) auf einen Framework-Laptop mit Linux umgestiegen. Fazit: Ich bin zufrieden, mir fehlt nichts.
Seit Ende 2022 bin ich bei Mastodon und seit Anfang 2023 nicht mehr bei Twitter. Fazit: Ich trauere um das Twitter von früher. Das Twitter von 2022 fehlt mir überhaupt nicht. Die anderen sind zwar jetzt fast alle bei Bluesky, und deshalb schmerzt es mich manchmal, dass ich da nicht bin, aber ich will nicht.
Seit Ende 2022 kaufe ich kaum noch E-Books bei Amazon, weil ich meinen Bedarf über die Bibliotheks-App Libby/Overdrive decke. Was es nicht auszuleihen gibt, kaufe ich (wenn ich es wirklich dringend lesen will) weiterhin, und zwar waren das zuletzt etwa fünf E-Books im Jahr bei irgendeiner deutschen Buchhandlung, deren Namen ich immer erst aus meinen Mails raussuchen muss, und etwa zehn englischsprachige im Jahr weiterhin bei Amazon, ohne besonderen Grund. Ich könnte wahrscheinlich leicht auch für diese zehn eine andere Quelle finden und habe es bisher nur aus Trägheit nicht versucht. (Update: Seit März 2025 ist diese andere Quelle Kobo.) Fazit: Ich bin sogar besser dran, denn durch das Leihen-statt-Kaufen spare ich viel Geld (einen hohen dreistelligen bis niedrigen vierstelligen Betrag im Jahr).
Seit März 2023 bin ich auch zum Verkaufen eigener Bücher nicht mehr bei Amazon, sondern bei Lulu. Die ��lteren selbstgemachten Bücher gibt es noch bei Amazon, weil ich sie nicht umziehen wollte. Ich glaube, dazu müsste man die Bücher selbst umbauen, es ist nicht damit getan, eine Datei anderswo hochzuladen, und dafür reicht meine Motivation bei den alten Büchern nicht. Fazit: Ich hatte dazu vorher keine Gefühle und ich habe jetzt auch keine.
Seit Anfang 2024 habe ich ein Fairphone. Allerdings benutze ich immer noch das ganz normale Google-Android mit seinen nicht deinstallierbaren Google-Diensten. Ich hätte auch mehrere alternative Betriebssysteme zur Wahl gehabt, im Nachhinein weiß ich eigentlich nicht, warum ich die nicht ausprobiert habe. Vielleicht wollte ich nicht so viel Veränderung auf einmal. Oder die Demilliardärisierung hat mich noch nicht so interessiert. Fazit: Es ist besser als mein voriges Handy (aber halt auch viel teurer).
Im März 2024 habe ich die Google-Suche durch kagi.com ersetzt. Fazit: Alles ist viel besser als vorher (kostet dafür aber auch $10 im Monat).
Bei Instagram habe ich mich Anfang 2025 abgemeldet, das war aber einfach, weil ich mich damit sowieso nie angefreundet hatte. Bisher kein Ersatz, ich suche auch keinen. Fazit: War egal, ist egal.
Von 2009 bis 2022 lagen meine Backups bei Backblaze, dann kurz bei Google, und seit Ende 2024 bewahre ich meine Backups wieder bei Backblaze auf. Fazit: Die Google-Interimslösung hat mir nie gefallen und ich bin froh, sie los zu sein.
Und jetzt eben kein Google Maps mehr. Meine Liebe zu Openstreetmap ist groß, aber mein Hass auf die störrische Benutzbarkeit der Android-App OSMand oft auch. Deshalb teste ich gerade eine andere App auf der Basis von Openstreetmap, "Organic Maps". Bisher finde ich sie ganz gut. Für den öffentlichen Nahverkehr in Berlin habe ich gerade heute wieder die "BVG Fahrinfo"-App installiert. Im Moment stelle ich mir noch vor, dass mir die Stauanzeige von Google Maps fehlen wird, tatsächlich fahre ich aber sehr sehr selten Auto, und auch in diesen Situationen hat sie mir bisher eigentlich nichts genützt, ich fand es nur schön, dass sie existiert. Und für die Google-Maps-Funktion, den eigenen Standort dauerhaft mit anderen zu teilen, brauche ich auch Ersatz.
Geplant, aber noch nicht umgesetzt:
Goodreads gehört auch zu Amazon, deshalb habe ich Ende 2023 / Anfang 2024 die Daten über meine gelesenen Bücher bei Goodreads exportiert und bei StoryGraph importiert. StoryGraph überzeugt mich bisher nicht so. Es ist unübersichtlich und ich kann es nur zum Tracken meiner gelesenen Bücher verwenden, aber nicht, um dort Buchempfehlungen zu finden. Manches ist aber auch besser, weil StoryGraph im Unterschied zu Goodreads gewartet und weiterentwickelt wird. Ich trage jetzt alles doppelt bei beiden ein und werde also eines Tages schnell und schmerzlos bei Goodreads aussteigen können.
Seit Herbst 2024 versuche ich von Gmail wieder auf Thunderbird umzusteigen. Das ist theoretisch gar kein Problem, ich habe sowieso die ganze Zeit meine eigene Mailadresse nur durch Gmail durchgeleitet und bräuchte diese Umleitung jetzt nur wieder abzustellen. Praktisch möchte ich aber gern meine gesamten Mailarchive in Thunderbird haben, wozu ich sie erst mal aus Gmail exportieren lassen und dann runterladen muss, und das ist bisher an Vergesslichkeit und Prokrastination gescheitert.
Der Techniktagebuch-Chat ist gerade (nach drei Abstimmungen in fünf Jahren) endlich vom Facebook Messenger zu Discord umgezogen. Das ist schon lange der Hauptgrund, warum ich noch im Facebook Messenger war. Jetzt muss ich mich nur noch mit wenigen Leuten auf andere Kanäle einigen, dann kann ich da eventuell ganz weg (nur 1 Freundin hängt an Facebook wie eine Napfschnecke am Felsen, also mal sehen).
Bisher nicht mal geplant:
Ich habe bisher nur äußerst flüchtig darüber nachgedacht, ob ich mich von Google Drive / Docs / Spreadsheets trennen sollte oder kann. Ich weiß, dass es theoretisch geht, und vielleicht würde mir auch da gar nichts fehlen, oder mein Leben würde sogar besser werden. Aber ich habe mich damit bisher nicht befasst. Außerdem läuft in einem meiner Jobs alles über Google (woran ich eventuell selbst schuld bin; ein noch zu schreibender Beitrag), da käme ich also sowieso nicht raus.
Auch beim Google-Kalender habe ich noch nicht über Umzug nachgedacht, obwohl das wahrscheinlich kein Problem wäre. Die Querverbindungen zwischen dem Kalender und anderen Googleprodukten nutze ich sowieso nicht, und wenn mal Termine aus meiner Mail automatisch im Kalender auftauchen, nervt mich das eher.
Bei Google Keep (der Notizzettel-App von Google) auch nicht, obwohl auch das leicht gehen müsste.
Und bei Google Photos auch nicht. Da würde mir die Bildersuche wirklich fehlen, sie findet zwar manchmal Frösche, wenn man Katzen sucht, hilft mir aber trotzdem oft weiter. Allerdings habe ich noch nie versucht, rauszufinden, ob es nicht doch irgendwas anderes gibt, wo mein Handy neue Fotos automatisch hochladen und nach Stichworten durchsuchbar machen könnte. (Spätere Beratung in der Techniktagebuch-Redaktion ergibt: Eher nicht.)
Google Pay, keine Ahnung, ob es da überhaupt Ersatz gibt.
Google Slides, damit habe ich seit 2016 alle Präsentationen bei Vorträgen gemacht. Ich stelle es mir aber leicht ersetzbar vor.
Update: Durch das Schreiben dieses Beitrags wird das Thema für mich sichtbarer, und ich beginne, konkreter darüber nachzudenken, was ich noch alles entmilliardärisieren kann.
Zwischen Anfang Februar und Mitte März 2025 ersetze ich Google Keep zuerst durch Joplin (zu kompliziert), dann durch Notesnook (verliert Notizen) und schließlich durch Obsidian (perfekt).
Ebenfalls Anfang Februar lasse ich mir (nach Beratung in der Techniktagebuch-Redaktion) eine kostenlose Nextcloud-Version zum Testen einrichten. Mit diesem Testen bin ich noch nicht weit gekommen, aber bisher wirkt es so, als ließen sich dadurch schmerzlos große Teile der Googlelandschaft ersetzen.
Mitte Februar gelingt es mir, die Standort-Teil-Funktion von Google Maps durch eine Kombination aus OwnTracks und Nextcloud zu ersetzen. Das ist aus der ganzen bisherigen Liste in diesem Beitrag das Einzige, was sich noch nicht schmerzlos ersetzen lässt, ich muss viel fluchen dabei.
Am 24. Februar steige ich nach 17 Jahren von Gmail wieder auf Thunderbird um, weil ich merke, dass ich ja einfach damit anfangen und die Archive später rüberholen kann. Ich plane aber den Umzug möglichst aller Mailarchive, damit ich zum Suchen in alten Mails nicht mehr Gmail öffnen muss. Der Umzug ist einfach, Thunderbird funktioniert problemlos, manches ist sogar besser als bei Gmail.
Am 27. Februar beginne ich damit, neue Textdokumente nicht mehr im Google Drive anzulegen, sondern in meiner eigenen Nextcloud. Das wirkt auf den ersten Blick unproblematisch und bequem. Ob und wie es mir gelingen wird, mein Textarchiv aus 19 Jahren mit umzuziehen, weiß ich aber noch nicht.
Google Pay nutze ich seit Mitte Februar nicht mehr. Mein Leben ist dadurch ein bisschen umständlicher geworden, aber nicht viel.
(Kathrin Passig)
12 notes
·
View notes
Text
Argentina 50 Años Jersey Font – Celebrate a Legacy in Style

Celebrate the golden legacy of Argentine football with the exclusive Argentina 50 Años Jersey Font – a tribute to the nation’s rich history and its collaboration with Adidas. Perfect for custom jerseys, Cricut projects, or football-themed gifts, this font echoes the design of Argentina's 50th Anniversary Kit and honors their 1978 World Cup win.
👉 Get the Argentina 50 Años Jersey Font on Etsy
🏆 Adidas x Argentina 50th Anniversary Kit – On-Pitch Tribute
Kit Release & Debut: Adidas released the Argentina 50th Anniversary Kit on November 14th, 2024, and the national team debuted it during a match against Peru on November 19th.
Design & Features: The kit blends classic white and light blue stripes with gold details, including the Adidas Trefoil logo and AFA lettering. It features a special collar graphic, black and gold shorts, and matching socks. The look is both modern and nostalgic.
Historical Significance: This is Argentina’s first-ever anniversary kit, celebrating 50 years of partnership with Adidas, which began in 1974. Though Argentina worked with other brands like Le Coq Sportif in the past, the Adidas connection was renewed in 2001 and remains iconic today.
Color Palette:
Main color: Ambient Sky
Gold accents for the Trefoil, AFA, and laurel wreath
3 stars symbolizing Argentina’s World Cup wins
🎨 What You’ll Get – Argentina 50 Años Font
This font is inspired by the unique number and name styling seen in the anniversary kit. You’ll receive:

✅ OTF & TTF files for easy installation
✅ Complete A–Z and 0–9 set
✅ Retro feel blended with modern block design
✅ High-resolution quality for vinyl and fabric use
👉 Get the Argentina 50 Años Jersey Font on Etsy
🖨️ How to Customize Your Jersey
Whether you're a collector or a fan who loves to wear your pride, you can apply this font to your own kit using:
Install the font on your computer
Open your software (like Canva, Illustrator, Cricut)
Create your name + number using this font
Export it for print
Use HTV or DTF printing with a heat press for best results

🛠️ 5 Best Tools for Using Football Jersey Fonts
To create your custom designs professionally, try:
Canva – Quick and easy mockups
Cricut Design Space – For vinyl cutting and layout
Adobe Illustrator – Vector editing and pro design
CorelDRAW – Great for large-format printing
Inkscape – A free alternative for SVG editing

youtube
🛍️ Why Buy from Etsy?
Our fonts are listed on Etsy, a safe and trusted marketplace for creatives. With instant download and secure checkout, Etsy gives you:
🔐 Trusted payments
📥 Immediate access to your files
✉️ Easy communication and support
🌍 Global accessibility
👉 Get the Argentina 50 Años Jersey Font on Etsy
❓ Frequently Asked Questions (FAQ)
Can I use this font with Cricut or Silhouette? Yes – the SVG and vector files are fully compatible.
Is this an official AFA font? No. This is a fan-made recreation inspired by the 50 Años kit for personal use.
Can I sell jerseys made with this font? The font is for personal use only. Contact us if you need a commercial license.
What formats are included? You’ll get OTF, TTF, SVG, AI, EPS files in a zip download.
How do I install the font? Just double-click the OTF or TTF file and click "Install" on your Mac or PC.
—
Unlocking the Style: The Significance of the 🇦🇷 Argentina 50 Años Jersey Font
The Historical Context of the 🇦🇷 Argentina 50 Años Jersey
Argentina football history, 50 years celebration, soccer jersey design, iconic sportswear
The Design Elements that Make the 🇦🇷 Argentina 50 Años Jersey Font Unique
jersey typography, font design in sportswear, visual identity, branding in jerseys
Why the Right Font Matters in Sports Jerseys: A Look at Impact and Recognition
sports branding, jersey recognition, fan engagement through design, typography importance in sports
The Influence of Typography on Team Spirit and Fan Culture
fan loyalty symbols, cultural significance of fonts, community identity through jerseys
A Closer Look at How to Acquire Your Own 🇦🇷 Argentina 50 Años Jersey Font Design
where to buy jerseys online, custom jersey options, limited edition sportswear availability
Conclusion: Celebrate Argentine Football Legacy with the Iconic 50 Años Jersey Font Today!
👉 Get the Argentina 50 Años Jersey Font on Etsy
Unlock the Nostalgia: Discover the Argentina 50 Años Jersey Font
Introduction: The Significance of the Argentina 50 Años Jersey
Argentina football history, commemorative jersey, sports design, football culture, jersey typography
The Unique Style of the Argentina 50 Años Jersey Font
jersey font design, typography in sports, unique athletic fonts, visual identity, custom jersey fonts
How to Incorporate the Argentina 50 Años Jersey Font into Your Designs
graphic design tips, sports branding, using jersey fonts in projects, personalizing jerseys, font applications
The Legacy of Argentina's Football Achievements Celebrated Through Design
football achievements history, Argentine football legends, cultural impact of sports jerseys, iconic designs in football history
Where to Find and Download the Argentina 50 Años Jersey Font for Your Projects
font download sources, free font resources for designers, where to buy jersey fonts online, creative marketplace options for fonts
Conclusion: Celebrate Argentine Football History by Using the Iconic 50 Años Jersey Font Today!
👉 Get the Argentina 50 Años Jersey Font on Etsy
#argentina#Argentina 50 Años#messi font#messi custom#leo messi#Messi jersey#world cup#world cup 2026#font#font design#fonts#fonts & typography#football#football jerseys#football numbers#jersey#soccer font#soccer#Soccer ttf#Soccer otf#Custom jersey#Youtube
4 notes
·
View notes
Text
VFX Era: Your Future Begins with Graphic Designing Course in Kanpur

VFX Era is redefining creative education in Uttar Pradesh through its comprehensive graphic designing course in Kanpur. Combining artistic training with career-readiness, this course equips learners with both the vision and the tools to become successful design professionals. Whether you're a recent school graduate or a mid-career switcher, VFX Era has built a design ecosystem that blends theory, practice, and professional mentorship.
What makes VFX Era unique is its complete learning cycle. From learning tools like Adobe Photoshop and Illustrator to understanding brand identity, visual storytelling, and user interface design, students are nurtured into becoming designers who solve real-world problems.
Why VFX Era's Graphic Designing Course in Kanpur Is the Ideal Starting Point
The growing demand for visual content across industries has created a need for trained graphic designers who are not just tool-users but thinkers and creators. VFX Era’s graphic designing course in Kanpur is designed to meet this demand with a practical, future-focused approach. Here, you don’t just learn how to use design software — you learn how to build brands, shape user experiences, and communicate visually.
From logos and brochures to social media content and website layouts, students work on real-time projects that mirror the needs of businesses today. This course doesn’t just prepare you to enter the industry—it prepares you to stand out in it.
The VFX Era Learning Philosophy: Creative, Practical, Professional
At the core of VFX Era’s teaching model is a blend of hands-on practice and conceptual clarity. The course aims to empower students with skills that are instantly applicable in the job market:
Understanding how design solves business problems
Translating ideas into visual campaigns
Creating cross-platform consistency for brand visuals
The course also introduces students to design systems and workflows that are used by professionals in advertising agencies, startups, eCommerce platforms, and global brands.
Course Structure: From Fundamentals to Industry-Level Mastery
Here’s a breakdown of what the curriculum covers:
Design Principles: Color theory, visual hierarchy, composition
Image Editing: Retouching and visual manipulation using Adobe Photoshop
Vector Graphics: Logo and icon creation using Illustrator and CorelDRAW
Typography: The art of readable and brand-oriented text design
Layout and Publishing: Flyers, posters, banners, and social media creatives
UI/UX Basics: Designing for websites and mobile apps
Brand Identity Projects: Packaging, logo kits, visual guidelines
In addition to these, students also receive special training in:
Freelancing and client handling
Building an online design portfolio
Content design for social media platforms
Basics of animation and motion graphics
Project-Based Learning at VFX Era
Every module is accompanied by a project. This means by the end of the course, each student has an impressive portfolio that includes:
Company logos
Product packaging
Event banners
Ad creatives
Website UI samples
Infographics and visual resumes
Students also receive reviews on their projects, just like in real agency settings. These critiques from mentors help learners understand what employers and clients expect.
Career Pathways After a Graphic Designing Course in Kanpur
The beauty of a graphic designing career is its versatility. After completing this course, you can work in:
Digital Marketing Agencies
Media and News Companies
Corporate Design Teams
Freelance Marketplaces
Startups and E-commerce Brands
You can also specialize in:
Branding Design
Social Media Content
Web Graphics
Packaging Design
Presentation & Pitch Deck Design
And if you want to scale further, combining your design skills with digital marketing or front-end development knowledge creates a competitive profile for roles like UI Designer or Digital Content Strategist.
The Role of Mentors in Your Creative Growth
Unlike self-paced online tutorials, the VFX Era experience is guided by mentors. These are industry professionals who:
Review your design drafts
Provide actionable feedback
Teach shortcuts and design hacks
Guide you on pricing, pitching, and professionalism
This mentorship accelerates learning, builds confidence, and prepares students for freelance gigs or full-time jobs.
The Power of Design in Kanpur’s Business Ecosystem
Kanpur is no longer just an industrial city. With the digital boom, local businesses are investing in branding, social presence, and customer engagement. From cafés and real estate firms to coaching centers and eCommerce brands, every business needs visual design.
As a certified designer from VFX Era, you can help these brands:
Build recognition through visual identity
Enhance online reach through engaging content
Improve customer retention through consistent visuals
And the best part? You can do all this while working from home or even as a part-time freelancer.
Expand Your Horizons: Combine Graphic Designing with Digital Marketing & Web Development
VFX Era doesn’t just stop at design. For students who want to expand their skillset, the institute also offers:
A full-fledged digital marketing course in Kanpur, where students learn SEO, PPC, email campaigns, and influencer marketing.
A practical web development course in Kanpur, covering HTML, CSS, JavaScript, and responsive design to build fast, beautiful websites.
By learning how your designs can integrate with marketing and web technologies, you’ll stand out as a full-stack creative professional.
Portfolio Building and Career Support
The course ends with a powerful capstone project and a complete review of the student’s portfolio. But VFX Era goes a step further by helping students:
Create Behance and Dribbble profiles
Draft a winning freelance pitch
Appear for mock interviews and client meetings
Build a design CV and pitch deck
Get referrals to freelance clients and agencies
This comprehensive support ensures you don’t just complete a course—you start a new career.
Final Thoughts: Why VFX Era Is the Top Choice for Graphic Designing Course in Kanpur
There are many ways to learn graphic design, but only VFX Era combines:
Experienced mentors
Real-world projects
Personalized feedback
Industry connections
Career-focused curriculum
That’s why it has become the most trusted name for anyone looking to become a designer in Kanpur.
Address: 117/H1/368 Pandu Nagar Neer Cheer Chauraha, Pandu Nagar, Kakadeo, Kanpur, Uttar Pradesh 208005 Contact: 063904 67467 Website: https://vfxera.com
If you’ve ever wanted to build a creative career, launch your own brand, or work in design globally — your journey starts here. Join the graphic designing course in Kanpur at VFX Era and unlock your true creative potential.
2 notes
·
View notes
Text
alright
its nearly payday
if one was hypothetically looking for a USB drawing tablet (budget friendly) and perhaps drawing software (I do have substantial experience with coreldraw and adobe photoshop) what would people recommend?
5 notes
·
View notes
Text
The Future of Design: Learn Graphic Designing in Ahmedabad
In today’s digital-first world, graphic design has become the backbone of communication. Whether it’s branding, social media, advertising, or UI/UX design — creativity paired with design software is in high demand. If you're someone passionate about visuals and creativity, enrolling in a graphic design course in Ahmedabad can be your gateway to a future-proof and rewarding career.
Why Graphic Design is the Future
Graphic design is no longer limited to magazines and posters. It plays a central role in every digital platform and marketing strategy. Businesses, content creators, YouTubers, influencers, and startups are constantly looking for skilled designers to create eye-catching visuals that convert. With technology evolving rapidly, designers with up-to-date training are in high demand globally.
This is where a professionally structured graphic design course in Ahmedabad can give you a competitive edge. The city is emerging as a design and tech hub, offering you the perfect environment to learn and grow.
What Makes Ahmedabad Ideal for Learning Graphic Design?
Ahmedabad is home to a growing design community, reputable institutes, and a thriving creative culture. Many young talents from across Gujarat and India choose Ahmedabad to start their design education. The city offers a blend of traditional art and modern digital trends — creating the perfect learning atmosphere.
Joining a graphic design course in Ahmedabad means you'll gain access to experienced mentors, hands-on projects, and industry-relevant tools such as Adobe Photoshop, Illustrator, InDesign, and CorelDRAW.
Key Benefits of Learning Graphic Designing
Here are some top advantages of taking up a graphic design course:
Creative freedom: Bring your ideas to life through visuals.
High demand: Every business needs designers — from startups to global companies.
Freelance or full-time: Choose the career model that fits your lifestyle.
Work across industries: Be it tech, fashion, education, or entertainment — designers are everywhere.
Upgrade your skills: With digital marketing and web development, graphic design enhances your skill set and job value.
Whether you're a student, working professional, or someone planning a career shift, a graphic design course in Ahmedabad can help you gain the skills and confidence to thrive.
What You Will Learn
A standard certificate course in graphic design typically includes:
Basics of design principles and typography
Image editing and layout design
Logo and branding design
Portfolio building with real-world projects
Introduction to UI/UX fundamentals
Graphic design is a powerful skill with unlimited potential. By enrolling in a graphic design course in Ahmedabad, you’re investing in a creative future with countless career possibilities.
About the Website
Kshitij Vivan is one of the top animation and design training institutes in Ahmedabad. Their specialized certificate course in graphic design is built for beginners and aspiring professionals looking to master modern tools and techniques. With experienced faculty, real-time projects, and career guidance, Kshitij Vivan helps you unlock your full design potential.
3 notes
·
View notes
Text
Maximize Your Printing Efficiency: The Ultimate Guide to Gang Sheet DTF Transfers for Custom Designs
Introduction
Hey there! If you're looking to streamline your printing process and discover a fabulous method for creating custom designs, you’ve landed in the right spot. In this ultimate guide, we’re diving into the world of gang sheet DTF transfers. Trust me; it’s a game-changer for anyone involved in the printing industry. Whether you’re running a small business or managing a larger commercial operation, understanding how to maximize your printing efficiency can save you time, effort, and money. So, roll up your sleeves, and let’s get started!
Maximize Your Printing Efficiency: The Ultimate Guide to Gang Sheet DTF Transfers for Custom Designs What is DTF Printing?
Direct to Film (DTF) printing is one of those innovative technologies that have transformed the way we think about fabric customization. Instead of traditional methods like screen printing or heat transfer printing that can be quite limiting, DTF allows for vibrant colors and complex designs on various fabrics with ease.
Key Features of DTF Printing:
Versatility: Works on cotton, polyester, and blends. Durability: Prints are resistant to cracking and fading. Ease of Use: Simple application process without extensive equipment.
Why should you consider Visit this page DTF? Well, if you want high-quality prints without breaking the bank or spending hours on setup, this might just be the route for you!
Understanding Gang Sheet DTF Transfers
So what exactly is a gang sheet? It's essentially a large sheet that contains multiple designs printed together for efficiency. Instead of wasting space on individual sheets, gang sheets optimize every inch by grouping designs—making them ideal for both small and large runs.
Benefits of Gang Sheets Cost-Effective: Reduces material waste. Time-Saving: Less time spent on setup means more production. Creative Freedom: Allows designers to experiment with multiple designs in one go.
When you're aiming to maximize efficiency in your operations, gang sheet DTF transfers should be at the top of your list!
The Process of Creating Gang Sheet DTF Transfers
Creating custom gang sheets isn’t as daunting as it sounds! Here’s a simple breakdown:
youtube
Step 1: Design Creation
Start by creating your digital artwork using design software like Adobe Illustrator or CorelDRAW. Make sure each design fits well within its designated area on the sheet.
Step 2: Print Setup
Load your film into a direct-to-film printer (the best DTF printer will make this step smoother). Adjust settings based on the material you’re using.

Step 3: Print
Print all designs onto the transfer film simultaneously! This is where you'll appreciate how much time you're saving.
Step 4: Apply Powder Adhesive
Sprinkle adhesive powder while the ink is still wet on your prints.
Step 5: Cure
Heat cure your prints using a heat press or oven until fully adhered.
Choosing the Right Equipment for DTF Printing
If you want to ensure quality results with minimal fuss, investing in reliable equipment is crucial. Here are some must-haves:
| Equipment | Description | |-------------------------|---------------------------------
2 notes
·
View notes
Text
#learn corel draw#corel draw#corel draw online#coreldraw x7#coreldraw graphics suite#corel draw 12#coreldraw software#coreldraw latest version#corel software#corel draw crack version#vector graphics
0 notes
Text
DTF Transfer Printing for Beginners: A Comprehensive Guide to Printing DTF Transfers at Home
As custom apparel and personalized items continue to gain popularity, creative enthusiasts are looking for efficient and affordable ways to produce high-quality prints from the comfort of their homes. Direct-to-Film (DTF) transfer printing has emerged as an accessible and versatile method for producing vibrant designs on various surfaces, especially textiles. DTF printing offers the advantage of application on a range of materials while maintaining exceptional color fidelity and detail. This article will introduce beginners to the DTF printers printing process, the equipment and materials needed, step-by-step instructions for printing transfers at home, tips for successful application, and the benefits of incorporating DTF printing into your crafting repertoire.
Understanding DTF Transfer Printing
DTF transfer printing is a relatively new technology that combines elements from both Direct-to-Garment (DTG) and traditional heat transfer methods. DTF printing involves printing designs onto a special film using specific inks that offer excellent adhesion and durability. The printed film is then coated with a layer of adhesive powder, which, when heated, bonds securely to the fabric. This process differentiates DTF from other transfer methods, providing vibrant prints, the ability to work with a wide variety of fabrics, and ease of application. For beginners, understanding the mechanics of DTF printing is essential for achieving high-quality results and exploring the potential of this versatile printing method.
Equipment and Materials Needed
To embark on your DTF printing journey, you'll need a collection of essential equipment and materials. The primary equipment required is a DTF printer, specifically an inkjet printer that can accommodate DTF transfer films. You’ll also need DTF inks, which are specifically formulated for this printing process, along with adhesive powder that helps form a strong bond between the transfer and fabric. Other necessary items include DTF transfer film, heat press, a weeding tool for removing excess film, and protective sheets to place between the fabric and heat press for safe application. While it may seem like a considerable investment upfront, many of these items can be purchased gradually as you become more comfortable with the process.
Step-by-Step Process for Printing DTF Transfers
Once you have gathered the necessary equipment and materials, the process of printing DTF transfers can begin.
1. Design Creation: Start by creating your design using graphic design software (like Adobe Illustrator or CorelDRAW) or purchasing premade designs. Ensure your design is in a compatible format and sized appropriately for your project.
2. Printing: Load the DTF transfer film into your printer. Print your design, ensuring to set it for "mirror" mode so that the image transfers correctly when applied to the fabric.
3. Adhesive Application: Once printed, sprinkle the adhesive powder evenly onto the wet ink immediately after printing. Gently shake off any excess powder.
4. Curing: Use a heat source, such as a heat press, to cure the transfer. This generally involves setting the heat press to a specific temperature (around 160-180°C) and applying even pressure for roughly 20-30 seconds. This step helps melt the adhesive powder into the print.
5. Weeding: Allow the transfer to cool, then weed out the unwanted areas of the film using a weeding tool, leaving you with your desired design.
6. Pressing on Fabric: Place your fabric on the heat press, position the transfer film (ink side down), apply the heat press again for another 10-15 seconds, and then let it cool before peeling off the film backing.
Tips for Successful DTF Transfers
To achieve the best results with DTF transfer printing, several tips can help ensure success. Begin by investing time in acclimating yourself to the equipment and practicing with various designs and fabrics. Experiment with different print settings, as printing at the right resolution and using suitable profiles for DTF printing can significantly influence the final output. It's also important to use high-quality DTF films and inks, as these will directly affect the vibrancy and durability of your prints. Lastly, always remember to conduct washing tests on fabric after the initial applications; this will provide insight into the longevity and durability of your DTF transfers and help you adjust your processes accordingly.
Benefits of DTF Printing for DIY Enthusiasts
For those interested in custom apparel, DTF transfer printing offers multiple benefits. One significant advantage is its versatility; DTF printing can be applied to a wide range of fabrics, including cotton, polyester, and blends. This flexibility enables crafters to experiment with different materials and styles without being restricted to specific substrates. Additionally, DTF transfers deliver vibrant colors and intricate details, making them ideal for creating striking designs on clothing. The process is also relatively straightforward compared to other printing methods, often requiring less upfront investment and offering rapid turnaround times for small batch production. Overall, DTF printing not only encourages creativity but also offers an efficient way to produce high-quality custom items.
Final Thought
In summary, DTF transfer printing provides an exciting opportunity for beginners and craft enthusiasts to produce professional-quality prints from home. By understanding the mechanics behind the process, gathering the right equipment, and following the steps outlined, you can start your venture into the world of custom printing today. Embrace the versatility and ease of DTF printing to create personalized apparel and accessories that reflect your unique style. As you gain experience and confidence, your creative possibilities will expand, allowing you to explore the full potential of DTF transfer printing. So grab your supplies, start experimenting, and watch your designs come to life through this innovative medium!
6 notes
·
View notes
Text
CorelDRAW! 3.0 - CorelPHOTO-PAINT! - icon 004
66 notes
·
View notes
Text
CorelDRAW Graphics Suite 2023
Professional graphic design software. CorelDRAW Graphics Suite is your fully loaded professional design toolkit for delivering breathtaking vector illustration, layout, photo editing, and typography projects with total efficiency.
https://find-your-software.com/corel/coreldraw-2023/

3 notes
·
View notes
Text
CorelDRAW – a powerful graphic design software
#coreldraw#photoshop#design#vector#art#graphicdesign#logo#vectorart#illustrator#illustration#digitalart#coreldrawx#designer#adobeillustrator#desaingrafis#corel#graphicdesigner#coreldrawindonesia#branding#artwork#graphics#kadounik#indonesia#logodesigner#creative#m#adobe#graphic#adobephotoshop#vektor
2 notes
·
View notes
Text
Mengenal Vector Image Portrait Draw: Seni Digital yang Memikat

Dalam dunia seni digital, teknik menggambar potret menggunakan gambar vektor (vector image portrait draw) telah menjadi populer. Berbeda dengan gambar bitmap yang terdiri dari piksel, gambar vektor menggunakan garis dan bentuk geometris yang ditentukan oleh persamaan matematika. Teknik ini memiliki sejumlah keunggulan yang membuatnya semakin diminati oleh para seniman digital.
Apa Itu Vector Image Portrait?
Vector image portrait adalah potret yang dibuat menggunakan software grafis berbasis vektor seperti Adobe Illustrator, CorelDRAW, atau Inkscape. Berbeda dengan gambar bitmap yang pecah atau kehilangan kualitas saat diperbesar, gambar vektor tetap tajam dan jelas dalam berbagai ukuran karena didasarkan pada perhitungan matematika.
Keunggulan Menggunakan Vector Image untuk Potret1.
Resolusi Tak Terbatas: Gambar vektor dapat diperbesar atau diperkecil tanpa kehilangan kualitas, menjadikannya pilihan ideal untuk berbagai aplikasi, dari cetakan besar hingga ikon kecil.
2. Pengeditan Mudah: Elemen dalam gambar vektor dapat diedit secara individual tanpa mempengaruhi bagian lain dari gambar. Ini memudahkan seniman untuk melakukan perubahan atau penyesuaian dengan cepat.
3. Ukuran File Kecil: Karena hanya menyimpan titik-titik dan persamaan, ukuran file gambar vektor biasanya lebih kecil dibandingkan dengan gambar bitmap beresolusi tinggi.Proses Membuat Vector Image Portrait1.
Sketsa Awal: Banyak seniman memulai dengan membuat sketsa awal di atas kertas atau menggunakan perangkat lunak menggambar digital. Sketsa ini kemudian diimpor ke dalam perangkat lunak vektor sebagai panduan.
2. Membuat Garis dan Bentuk: Dengan alat seperti Pen Tool, seniman menggambar garis dan bentuk dasar berdasarkan sketsa awal. Ini melibatkan penentuan titik-titik jangkar dan menghubungkannya dengan kurva atau garis lurus.
3. Penambahan Warna dan Detail: Setelah bentuk dasar selesai, langkah berikutnya adalah menambahkan warna. Warna dalam gambar vektor biasanya ditambahkan menggunakan fill (isi) dan stroke (garis tepi). Seniman juga dapat menggunakan gradient (gradasi) dan shading (pemberian bayangan) untuk menambah dimensi dan kedalaman pada potret.
4. Penyempurnaan dan Sentuhan Akhir: Langkah terakhir adalah penyempurnaan dan penambahan detail kecil yang membuat potret tampak lebih hidup. Ini bisa termasuk penyesuaian warna, penambahan tekstur, dan penghalusan garis.
Tips dan Trik- Gunakan Referensi yang Baik:
Memiliki foto referensi yang berkualitas tinggi akan membantu dalam menghasilkan potret yang akurat dan detail.
- Pelajari Penggunaan Alat: Menguasai alat-alat dalam software grafis vektor adalah kunci untuk efisiensi dan kreativitas.
- Eksperimen dengan Gaya: Jangan takut untuk bereksperimen dengan berbagai gaya artistik. Vector image portrait bisa bervariasi dari realistis hingga kartun.
Aplikasi dan Penggunaan Vector image portrait banyak digunakan dalam berbagai bidang seperti desain grafis, ilustrasi buku, desain logo, dan bahkan dalam media sosial dan konten pemasaran. Kemampuan untuk menghasilkan gambar berkualitas tinggi dengan fleksibilitas ukuran membuatnya menjadi alat yang sangat berharga bagi para profesional kreatif.
Kesimpulan
Vector image portrait draw adalah teknik menggambar yang menawarkan banyak keuntungan dalam hal kualitas dan fleksibilitas. Dengan kemajuan teknologi dan perangkat lunak grafis, siapa pun dengan minat dan dedikasi dapat belajar dan menguasai teknik ini. Seni menggambar potret dengan vektor tidak hanya memungkinkan untuk menciptakan karya yang menakjubkan, tetapi juga memberikan kebebasan dalam berekspresi dan berkreasi.
Pesan vector image portrait draw di SINI
2 notes
·
View notes